STEM

Normandale Community College offers Foundations of Vacuum Science course online

Logo-email-version_0914

I was asked by my friends at Normandale Community College to get the word out about an online vacuum technology class they are launching, Foundations of Vacuum Science. This class is designed to give the learner a background in the physical sciences needed for a solid foundation on which to learn vacuum technology.

Normandale Community College offers accredited vacuum and thin film technology courses and specializes in training the technicians that are in high demand in Minnesota. I featured Normandale in a recent post if you would like to learn more. They have an impressive faculty that is passionate about vacuum technology. I very much recommend their program.

Links to the course documents:

VACT1900_Spr2018_CourseSyllabus

VACT1900_InstructionsToRegisterAtNormandaleCC_RegisterStarID_1802Feb23

Spring2018_VACT1900_01OnlineClass_CoHortRegistrationForm_Rev01


Thoughts about the SpaceX Falcon Heavy Test Flight

I was going up to YouTube and found a video taken live during the launch of the SpaceX Falcon Heavy rocket. As a kid growing up in the 60s, we would always watch the rockets launch. We would even take time out of the school day to watch space events on one of the three TV stations that we had access to.

I must admit that I have not seen a live space launch, probably since 28 January, 1986. With launches up to the International Space Station being so routine and the busy work-a-day world, I have lost that boyhood infatuation with space travel.

Today, I find myself looking at the interest in manned space flight to Mars. I am seeing a younger generation leveraging the Baby Booomer generation’s technology and putting their hopes and energy into space travel. We have a great many talented young folks getting involved with space on an engineering level. It is actually fun to see these younger folks get excited about space and that is great because it gives us a drive to become strong in science and technology again.

When I look at a rocket or a space mission, I see a lot of engineering and technology that is supported by vacuum technology. I think of the systems used in the manufacturing and testing of space technology and how the Vacuum Industry has supported space science and exploration.

Launch of the SpaceX Falcon Heavy rocket

Launch of the SpaceX Falcon Heavy rocket

With mild interest, I started watching the video and although it was not live, I found myself getting caught up in the excitement. The SpaceX Falcon Heavy is quite a piece of engineering. It can put 63,800 kg (70 tons) of payload into low Earth orbit.using 27 SpaceX Merlin engines. Only the Saturn V from used in the Apollo program has lifted a heavier payload.

The second unique engineering feet that SpaceX has accomplished is the reuse of rocket boosters. The boosters and the center core return to Earth for refurbishment and reuse. This supports the SpaceX drive to vastly reduce the cost of space travel.

Falcon Heavy at Max Q, the time of the heaviest stress on the rocket.

Falcon Heavy at Max Q, the time of the heaviest stress on the rocket.

This mission was a test flight of the Falcon Heavy. For a test flight, a “mass simulator” is put in the rocket to simulate a real payload. Examples of “real payloads” might be a package of instruments, supplies for the International Space Station or sections of a space station. This mission had something a little more fun. It had a cherry red Tesla Roadster with a mannequin in a SpaceX space suite. Also on board was an archival package, a plaque with the names of the SpaceX employees and some Issac Asimov novels.

Passenger seat view from the Tesla Roadster launched on the Falcon Heavy rocket.

Passenger seat view from the Tesla Roadster launched on the Falcon Heavy rocket.

Once the fairing was opened, the Roadster and Starman were exposed to space. The plan is to put them in orbit “for a billion years”. Yes, this is the actual view from the roadster in space.

Actual view of the Tesla Roadster and Starman dummy headed for their new Mars crossing orbit around the sun.

Actual view of the Tesla Roadster and Starman dummy headed for their new Mars crossing orbit around the sun.

Okay, this is some fun stuff. It certainly tickled my funny bone to see this non-serious mass simulator put into orbit. I think back on my baby boomer generation and wonder why they just couldn’t kick back an exhibit a little insouciance*.  But back then, space travel was real serious. After all, the Reds were watching.

MVac-D SpaceX Merlin engine pushing the Falcon Heavy payload into orbit.

MVac-D SpaceX Merlin engine pushing the Falcon Heavy payload into orbit.


*Insouciant
noun
1.
lack of care or concern; indifference.

The Second Edition of Understanding Modern Vacuum Technology is Now Available!

2nd Edition FLAT REV.jpg

Cover art for the book Understanding Modern Vacuum Technology, 2nd Edition 

The second edition of Understanding Modern Vacuum Technology is now available! This book contains all the information found in the first book PLUS information that is not found in any other book to date.

What’s new? There is information on the cutting edge technology being done at NIST to develop new quantum based pressure standards. This is so new that the project is moving from the concept and feasibility phase to developing the standards that will replace the mercury manometers that are the primary standards used today.

There is an extensive section describing the Granville-Phillips VQM™  (Vacuum Quality Monitor). This is a revolutionary method for measuring the gas composition in a high vacuum system based on ion trap technology.

The second edition contains an introduction to leaks and their detection.

There are now knowledge check questions at the end of each chapter.

The book is available through Amazon.com and Amazon’s European websites including Amazon.co.uk, Amazon.de, Amazon.fr, Amazon.it, and Amazon.es. For larger quantities, it is recommended to order from the Understanding Modern Vacuum Technology book store.

A personal landmark is disappearing

I got a tweet this morning from UVM. That is where I earned my degrees in physics. The tweet said that there is a webcam feed to watch the Cook Science Building deconstruction. This is where I began my journey into vacuum technology. Below you can see bricks being torn off of the facade facing east towards Mount Mansfield.

Vacuum Technology, Cook Science Building.jpg

On the fourth floor, you see three big empty rooms. That is were I used to teach undergraduate physics labs to young aspiring engineers, scientists and pre-med students. Across the building  from the yellow arm on the fourth floor was my vacuum lab where I I had a glass and metal UHV system that was the heart of my thesis research. Off to the right on the fourth floor I can see the window to my office I had as a graduate student. So many memories.

The original idea was to renovate Cook, which was built in 1969. The deconstruction of Cook was priced at $4M, however the old building had a $28M maintenance cost. A new building makes good engineering sense. This is part of a master plan to increase STEM delivery at UVM.

As I look back in time, I could not see myself in my lab thinking about the day that Cook would come down. What I did know was that I was learning skills that I could take out into the work world. I can remember making the decision to dig deeper into vacuum technology as a way to stay connected with science and engineering after graduating…and putting some brass in pocket.


Get an Intuitive Feel for Gas Properties with this Simulator

Today I want to bring attention to the PhET Gas Properties Simulator. This is a wonderful tool that allows a learner to interact with all of the levers in a gas system. The tool is set up so that the learner can add gas particles into a chamber and then see the results as the system’s parameters (temperature, volume, etc.) are changed.

In the figure below, I introduced equal amounts of a heavy gas and a light gas (60 of each) and then opened the lid on the top of the chamber a bit to see what happens. After letting the simulation run for a short while I could see that the light gas was escaping faster than the heavier gas, the temperature was dropping in the system along with the pressure.

Capture PhET1.PNG

60 heavy gas molecules and 60 light gas molecules were introduced into the chamber. The lid was cracked open and gas was allowed to escape. At the time of the screen shot, 55 heavy gas molecules and 50 light molecules remained in the chamber.

There are also some graphs that give insight of the molecular speeds and energies of the molecules. Lessons and exercises are available on the PhET website.

As a vacuum technologist, I think in terms of molecular flow where the molecules interact with the walls of a conduit rather than collide with each other. When opening the lid to allow that gas to expand out into space, it occurred to me that this is also a good tool to help convey the idea that in order for a pump to remove a gas molecule from a chamber, the molecule has to enter the pump’s inlet. Since the lid has a variable aperture, it can be use to introduce the concept of how a high vacuum pump’s pump speed is dependent on the inlet diameter .

The Gas Properties Simulator is suitable for high school, college, and continuing education students. I have loaded it onto my work laptop and will be using this in my corporate vacuum lectures in the future. I hope you will find it useful too.

Understanding Modern Vacuum Technology discusses the gas properties that can be explored with this simulator. UMVT also discusses vacuum pumps and pressure measurement.

Cryopumps for Executives and other Layfolk

I was once asked by my corporate executives to explain how cryopumps work with the orders, “Keep the physics out of it, Steve.”

“Hmmm…”, I thought to myself, “How the devil and I going to do that?” And there was

Capture.PNG

Cryopump figure from US6263679

the challenge. When dealing with the top executives, you don’t want to start the lecture with, “First there was a Big Bang…” and then talk about the history of the universe and how that lead to cryopumps. The executives were facing some technology challenges and they needed to understand actually what cryopumps are, what they do and why use a cryopump instead of a turbomolecular pump.

Then I realized that I although my execs are highly skilled engineers, they do not live and breathe vacuum technology day in and day out like I do. After all, that is why I am on the payroll, so they don’t have to put attention on the vacuum equipment. This post was inspired by the presentation that I put together for my execs, “Cryopumps for Layfolk”

frosty.JPG

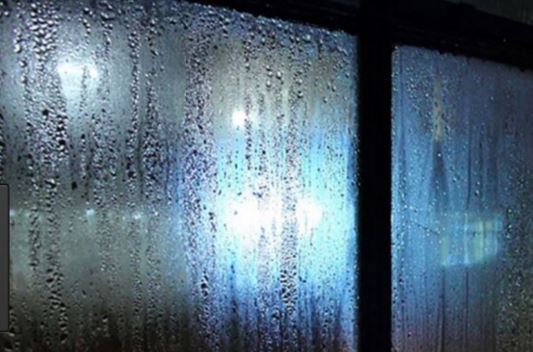
We all have had the observation that frost and ice forms on a cold surface. Most of us were born after the advent of the frost-free refrigerators. Those of us who were not can remember the times when mom and dad had to defrost the freezer in the middle of summer when high humidity condensed and froze on the walls of the freezer. (I am in that latter mix.)

You may ask, “What does this has to do with vacuum technology?” That is a fair question.

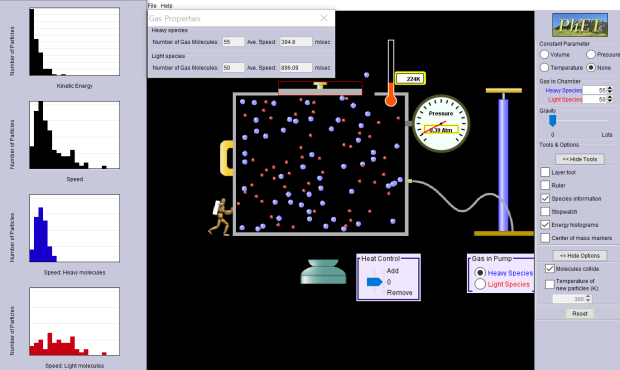
Consider a closed chamber with a fixed amount air inside. That air exerts a pressure on the inside surface of the chamber.

frost.JPG

Now let’s make the chamber wall so cool that the gas freezes on the side of the wall. Molecules that are taken out of the gas phase and made into a solid phase no longer contribute to the chamber pressure. Mr Freeze.JPG

This is the basic principle of cryopumping, use cold surfaces to capture molecules that are in a gaseous state so they do not contribute to the pressure in the chamber. There are three methods of capture.

The first method of capture is condensation, the process in which a gas changes state into a liquid, usually when it comes in contact with a cold surface. This is an excellent method of dehumidifying a room in the hot summer, but it is not very useful in high vacuum systems. Depending on the temperature, the liquid can easily revert back into a gaseous state and the pressure will remain relatively high.

condensation.JPG

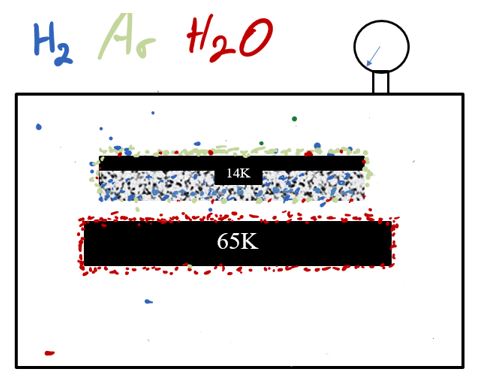
In the chamber below we have a mixture of gases, hydrogen, Argon and water vapor. The total pressure in the chamber is a sum of the partial pressures of each of the gases. I have chosen these three gases because they are each captured differently in a cryopump, as you will see.

Capture1.JPG

Now let’s put a cold surface in the system at 35ºF. This is cold enough to condense the water vapor, but the liquid water is still fairly mobile and will tend to drip in the chamber. We may expect a slight decrease in pressure. However the dripping in the chamber is not acceptable.Capture2.JPG

frosted.JPG

The second method is to capture gas with very cold surfaces. This is known as cryosorption. When a gas molecule strikes a cold surface and remains, it gives up heat to the surface. It can remain in solid form if the temperature is below the freezing point of the gas at the system pressure. This depends on temperature and pressure. 

The way to capture gas and have it remain is to keep the surface temperature well below the freezing temperature of the gas.

Let’s take our system and put a cold surface in that is well below the freezing point of water at the desired pressure. Here we have the surface chilled to 65K. At that temperature, nearly all of the water in the chamber that strikes the 65K surface will remain in solid form, thus it is no longer able to contribute to the pressure in the chamber and the pressure drops accordingly. A surface at 65K is cold enough to pump water vapor and many hydrocarbons.

Capture3.JPG

The 65K surface is not cold enough to cryosorb H2 or Ar, so they will remain in a gaseous state. Some of the H2 and Ar may become trapped in the water ice, however a more efficient way to pump H2 and Ar is to put another surface into the chamber chilled to 14K.


Capture4.JPG

The 14K surface is cold enough to freeze out the argon. It will also capture N2, CO, CO2, Kr, O2 and other such condensable  gases. This leaves the non-condensable gases such as H2, He and Ne.

In our system, we still have the H2 gas remaining. There is a third cryopumping mechanism that is employed, cryotrapping. This method of pumping is done by taking a porous substance and chilling it down to a cryogenic temperature. When a gas molecule lands on the surface inside one of the pores, it will give up it thermal energy and reside there for an extended period of time. The colder the substance, the longer the gas will stay on the surface. In the days before dry roughing pumps, canisters of Zeolite were chilled in liquid nitrogen. The gas would then be cryotrapped in the high surface area Zeolite.

Another material is coconut charcoal. This has a high surface area and is extremely porous. Charcoal is typically cooled to between 9K and 15K for the purpose of cryotrapping H2. Capture5.JPG

As the charcoal becomes saturated with H2, the ability of the charcoal to pump H2 will diminish. In order to rejuvenate the pump speed, the charcoal is warmed up and the hydrogen is liberated.

Now lets add a layer of porous charcoal on the 14K surface. Now we have a means to pump every gas that will be found in a vacuum system and the pressure drops accordingly.

Capture6.JPG

Now that we know how to pump gases with cryogenic surfaces, we can take a look at the application of these methods.

Capture7.PNGThe construction of a cryopump is built around the cold-head cylinder. Inside the cylinder is a reciprocating “displacer” which is like a hollow piston which compressed helium is allowed to expand. There is a whole thermodynamic refrigeration cycle associated with this that is beyond the scope of this piece. I do have it explained in detail in the book Understanding Modern Vacuum Technology.

The figure to the left is from UMVT pg 206. Inside the cryopump, mounted to the refrigerator is the radiation shield. This surface is kept at 80K in this illustration and is set anywhere from 65K to 100K depending on the cryopump model. In my descriptions above, I used 65K to match our process requirements.

The radiation shield at 80K is thermally connected to the inlet 80K condensing array. Inside the pump, the top of the refrigerator is a cold stage that operates at 14K. An array containing bare surfaces and surfaces covered with charcoal is affixed to the 14K stage. Now let’s see how it all works together.

Capture8.PNG

The cryopump is attached to a chamber. Water vapor in the chamber strikes the 80K frontal array and is cryosorbed onto the surface. Gases that do not cryosorb at 80K are allowed to enter into the pump. Gases such as Ar, N2, O2, etc. are cryosorbed onto the 14K surfaces and the He, Ne and H2 are cryotrapped in the charcoal. In most cryopumps, the charcoal is protected such that the condensable gases will strike a bare surface first, leaving the charcoal relatively free for trapping the non-condensable gases.Capture9.PNG

This particular design of a cryopump is used where there isn’t an appreciable amount of H2 in the chamber. It is easier for gases to strike the bare 14K surface first, which means the H2 has to make several collisions inside the pump before it becomes cryotrapped. This may reduce the H2 pump speed, which a compromise for this arrangement.

You may ask, “Why not just make everything 14K and be done with it?” There are two stages where arrays are attached to the cryopump refrigerator. The 80K stage (known as the first stage) can handle much higher amounts of the heat, 45 watts is a typical value. The 14K stage (know as the 2nd stage) can only handle on the order of 8 watts. Thus the 80K stage is used to handle the heat load from the external pump walls and the 14K stage only sees a 66K temperature difference rather than a 270K difference from the room temperature vacuum vessel wall.

There are many safety protocols that must be followed. Cryopumps are “capture” pumps, meaning that they store the gas pumped rather than compressing and exhausting it as in the cases of turbomolecular pumps and mechanical roughing pumps. Once the cryopump reaches capacity for a gas, the pump speed suffers. At that point the cryopump must be “regenerated” The pump is allowed to warm up and the gas is liberated. Unless the gas can escape, it can reach extremely high pressures at room temperature. In order to prevent the vacuum vessel from rupturing and creating a safety hazard, the gas is allowed to exhaust through a poppet valve that opens at just above atmospheric pressure.

Since a great deal of gas can be stored in the pump, proper safety precautions must be followed so that the ambient air is still breathable in the lab or reactive byproducts do not cause other hazardous conditions. Be sure to read and follow all safety information in the pump’s manual.

Finally, I have talked a great deal about pumping H2 with cryopumps. Processes involving H2 can create explosive conditions and there are a set of safety protocols specifically for H2. Of particular danger are the processes that produce ozone. Ozone is very reactive in cryopumps during the regeneration process. I bring this points up not to scare you away from cryopumps, I just want you to be aware.

I hope that you found this little primer helpful if you have not been exposed to cryopump technology before. In Understanding Modern Vacuum Technology, you will find a wealth of information about cryopumps, a detailed description of the closed loop helium refrigerator and information about cryopump safety.


Training the Next Generation of Vacuum Technologists

I had the opportunity to talk with Del Smith of Normandale Community College in Bloomington, Minnesota last fall at the American Vacuum Society Symposium in Nashville, Tennessee. Del has put together a phenomenal set of accredited classes specifically to teach vacuum technology and thin film technology with the purpose of graduating qualified technicians.

In this video, Del presents the concept of vacuum technology to laypeople and discussed the importance of training qualified technicians. He points out that unlike mechanical, electrical or medical technicians, vacuum technicians are a relatively small group of individuals but are in high demand.

It is well worth watching this video as Del explains the importance that industry is placing on having trained individuals who understand in detail vacuum technology beyond just being able operate the equipment from recipes without understanding.

From the YouTube post:
“Published on Nov 9, 2016 From TVs to potato chip bags, “thin film” is used in myriad ways. Normandale Community College is helping to make it possible for you to use all of your current technology. It is the only community college in the country to offer an associate degree in vacuum and thin-film technology. Every electronic device uses thin film in some way and NCC is focused on the thin-film used in computer chips and computer hard drives. Del Smith is a graduate of the University of Minnesota, and has worked for high tech companies in the Twin Cities area his entire career. Del spent thirty years at Honey-well Aerospace, where he was the lead engineer in two different areas; the Thin Film Facility and the Vacuum Laboratory. Del was a member of the team that established the Vacuum and Thin Film program at NCC in the mid 1990s, and taught part time for a few years. The program was started at the request of several local companies who recognized the need for more educated technicians as the equipment they were using became more complex. Today, due to a three year $800,000 grant from the National Science Foundation, Del’s class reaches students not only in Bloomington, but as far away as Ireland through “telepresence” instruction. Join us to learn more about this technology and the ways our lives depend on it.”

I admire Del for the well thought out program and equipment he put together and his desire to to give back to the vacuum industry.